S-turns are a ground reference maneuver that, like turns-around-a-point, teach you to fly the airplane at a specific altitude and make wind corrections to keep the plane on a specific ground track. The difference is that s-turns force you to do so while changing your direction of turn halfway through the maneuver, while turns-around-a-point use the same direction of turn the whole time.
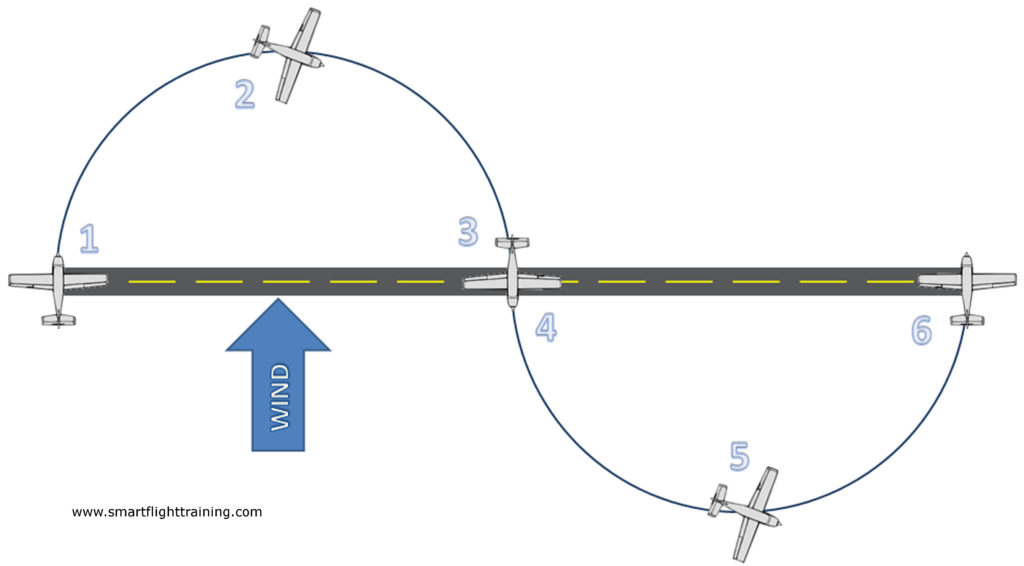
An s-turn looks, from above, like an “S” laying on its side on the ground (or a “$”, since you’ll generally use a road or something to mark when to start and end your turns). This sounds simple enough, but the point is to carve that S shape so that both sides are equidistant from some points on the road, such that when you cross the road and change the direction of your turn, you are equidistant from your first point (let’s say for your left turn), and your second point (for your turn the other direction). This is a little easier to picture when you look at – well, a picture. See below:
In this maneuver, there are 5 critical points (in the above example, points 3 & 4 can be considered together). Just like doing turns-around-a-point, this maneuver is really about finesse and a constantly changing bank angle and wind correction. If you understand what each of the critical points should look like and why, the rest of this maneuver will fall together pretty easily.
So let’s take a look at those critical points. Reference the image above:
Point 1: This is the beginning, or “entry” to the maneuver. It is “downwind,” meaning the wind is directly behind you, pushing you. You’ll choose a point to use, and then when the plane is directly above the road, you begin your turn. The reason this maneuver is generally started on the downwind leg is because your “ground speed” (actual speed over the ground) is fastest when you are downwind, so your rate of turn needs to be highest to maintain your distance from the point. This also (and most importantly) means that your bank angle will be steepest here. Keep in mind that “steepest” in regard to bank angle is relative – all this means is that your bank for the rest of the maneuver will never be steeper than at this point. It does not mean that you will be in a “steep turn,” which is a totally different maneuver!
Point 2: The next point is 90 degrees from the starting point, and is a direct crosswind. Here, your ground speed is slower than at point 1, and faster than it will be at point 3 / 4, so you will have a “medium” bank here, and you will have the airplane “crabbed” into the wind to maintain the track of the “S.” You should have been slowly changing your bank and your crab angle the whole time from point 1 to point 2, and you will continue to slowly change them between point 2 and points 3 / 4.
Point 3 / 4: At point 3, you are 180 degrees from where you started, which means you are now pointed directly “upwind” (or into the wind). This means you will have the slowest ground speed, and commensurately, the “shallowest” bank angle relative to the rest of the maneuver. Also, notice that during upwind – point 3 /4 – (and downwind – points 1 / 6), you have no “crab angle” like you do at points 2 & 5. This is because there is no crosswind at these points for you to correct for – you are flying directly into (or directly with) the wind. Point 3 / 4 is like the opposite of points 1 / 6 as far as ground speed and bank angle are concerned (points 1 / 6 = highest ground speed & steepest bank; point 3 / 4 = lowest ground speed & shallowest bank). This point puts you directly over the road again, and your goal is to reach this point so that your wings (your lateral axis) are parallel to the road at the time you cross. You will change your direction of bank here (in our example image, from right to left).
Point 5: At point 5 you have nearly completed the maneuver – you are again in a direct crosswind, so your ground speed will be faster than at point 3 / 4 (but still slower than points 1 / 6), meaning you will be in a medium bank here. You will also be crabbed into the wind here, similar to point 2. Notice that at point 2, however, you were crabbed toward the inside of the “S,” but at point 5 you are crabbed toward the outside of the “S.” Your crab angle will always point the nose of the plane into the wind.
Point 6: Point 6 is exactly the same as point 1, only instead of just starting your s-turn maneuver, you will be ending it. Just like at point 1, you will have brought the plane back to its steepest bank, and just like at point 3 / 4, your goal is to reach this point with your wings (the lateral axis of your plane) parallel with the road. Quickly and firmly roll out of the bank as you cross the road, bringing you back to level flight.
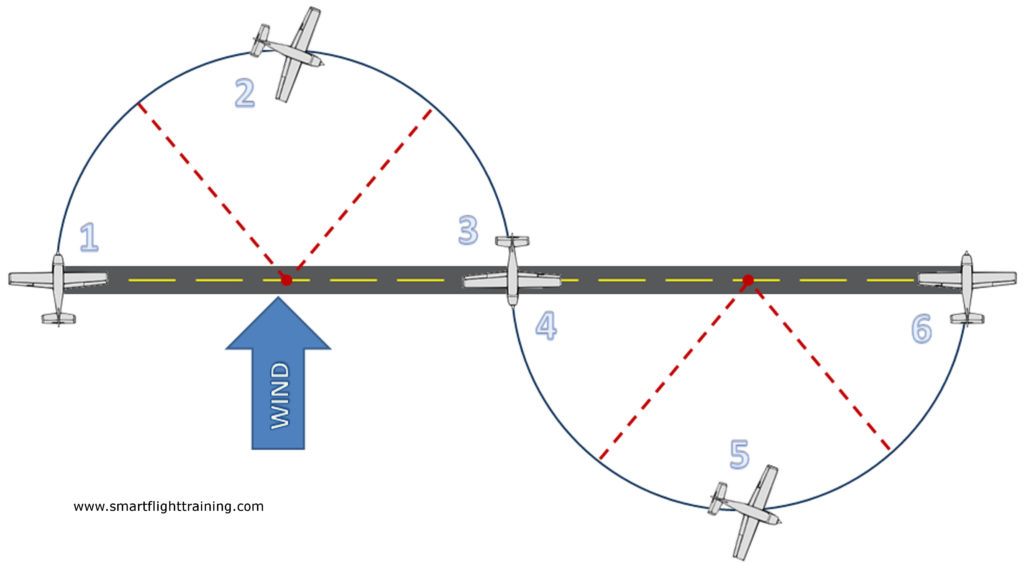
Notice that you are maintaining a constant radius in this maneuver, just like in turns-around-a-point. In the below picture, I’ve added red, dashed lines to the basic s-turn image, to show that your radius should be fixed as you do this manuever:
In fact, you can think of this maneuver as turns-around-a-point, split in half, and twisted around so that you don’t end up in the same place over the ground, but that you end up going the same direction as when you started, just further down the road from where you started.
Just as in the turns-around-a-point maneuver, the main thing to remember is that your bank and crab angles are constantly changing to do this maneuver correctly… you don’t hold your steepest bank until you reach point 2, then change to a medium bank and add crab, then hold that until point 3 / 4, etc. Essentially, you will be thinking ahead of the plane and making slight, minute adjustments to get you from the configuration you need at point 1 to the configuration you know you will need at point 2, and so on.
There also is no “secret recipe” to getting this maneuver perfect every time. Each day you fly, the winds will be a little different – they may be higher or lower speed than they were last time, or they might be gusty, or you might be in a different plane than you were in last time you did turns around a point… the moral of the story is, you’re the pilot! You’ll need to estimate and correct to get it right – so if you find that the bank angle or crab angle you choose is too much or not enough, make the change and fix it!
Indeed, a good way to think about this maneuver is that you are “timing” the turn to allow you to cross the road with your wings parallel each time you cross the road, and then adjust your bank and crab angles to keep you as close to the “right” distance as possible, and also to get your wings lined up correctly for your “crosses” at those critical points!
Do you have any tricks or suggestions on how to execute a perfect s-turn every time? Let your fellow pilots know how YOU perfected this maneuver in the comments, below!
Andrew Hartley is a certificated flight instructor in Columbus, Ohio.

